
10 | Voicings (Part 1)

With the basics of jazz harmony covered, it’s time to start looking into how we can apply it. The way we arrange the notes in a chord is known as voicing and is integral to all aspects of jazz. From pianists sounding a single chord to arranging harmonies for a full big band, it’s all in the voicing that the character of the music is displayed. Because of the extensive use of tensions in jazz, and the timbrally-similar instrumentation, we need to be particularly aware of what voicings we use for the horn section.
FOUR-WAY CLOSE
I’m starting with one of the most common ways of voicing chords in jazz. A close voicing means a chord where the top and bottom notes fall within an octave. The four-way tells us how many voices we have.
Four-way close therefore means to arrange a four-note chord within an octave.
A common way to harmonise a melody in jazz is to hang notes below it, making sure the harmony is supported. Let’s take this thrilling melody:
(By the way, with all the examples in this article, you’re seeing exactly what an alto sax would see. That means the audio is a minor 6th lower than the notated example.)

Thrilling Melody
The harmony is C6. Using four-way close, I’m then going to hang notes below each of the notes of the melody.

Thrilling Melody Harmonised
By the way, if this was Cmaj7, we would have a problem. In the first chord, having our 7th (B) under our root (C) creates a minor 2nd at the top of the chord. Even if we drop the B an octave, we get a minor 9th interval which is worse. I mentioned in the last article the problem with major 7 chords and 3 ways to fix this issue. You can always swap out a maj 7 chord for a maj 6 chord as has happened here, but, let’s look at one solution in more detail now.
Chord Tone Substitution
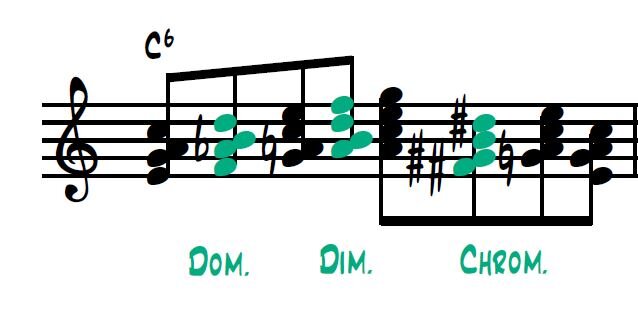
Just because a chord symbol says Cmaj7, doesn’t mean it has to just be Cmaj7. In the previous article I spoke about available tensions. In four-way close, we’re still only allowed four voices, so we can’t add any more tensions, but we can certainly substitute chord tones for more tasty ones. Just remember not to use any unavailable ones. This chart should come in handy:
R - 9/#9/b9
7 - 6
5 - 11th/#11/13/b13
3 - 4
This shows us what chord tone we can substitute with the different tensions. For example, for the root note in a chord, we can use the 9th, #9 or b9 instead (depending on the context). It works no matter the inversion or voicing. So in what context can we swap out different notes then? It depends on chord type and it’s harmonic function. You can refer to this table from the previous article to see what chord tone you can substitute in a variety of chords.

Available Tension
So let’s take our harmonised melody and substitute some chord tones:

In the first chord I’ve substituted the root for the 9th and the 5th for #11. It’s a major 6 chord so checking the table above, these are the only two notes I can substitute. The 9th and #11 tend to appear together (rather than just the #11th) because the interval they create is a 3rd or 6th. Imagine we left the root note, C, there instead and used our #11 (F#). We’d get a much more dissonant tritone. Having the 9th as well as the #11 creates a consonant interval within the voicing and takes some of the edge out of the usually tangy #11 against the root.
If it were a C maj 7 chord, rather than C6, notice how this substitution of C to D would also solve our problem of the minor 2nd?
Pianists and guitarists will take liberties with chord symbols all the time and substitute more colourful notes based on their taste. As the arranger, you have this freedom too.
By sheer coincidence, the melody so far has only been chord tones of the Cmaj7 harmony, so that makes harmonising it pretty easy. But of course, a melody is rarely just chord tones.
Approach Notes
Remember approach notes? They’re the non-chord tones that link our chord tones together. Approach notes always lead into a target note. The first thing to do with any melody is to analyse it for chord-tones (target notes) and approach notes. It’s also useful to label whether the approach notes are diatonic or chromatic.
Here’s the melody from before embellished with approach notes. The D = diatonic and C = chromatic. The arrows show which target note the approach note belongs to:

Approach Note Melody
Note: The Eb approach note should really be written as D#, but when transposed into Eb for alto sax, becomes F# to G, which is more logical for the player.
The next step to harmonise this melody would be to use our four-way close method to harmonise all of the chord tones. We can also call these chord tones our ‘target notes’ and they’ll be notes that are part of the harmony (the chord symbol):

Approach Note Melody - Harmonised Target Notes
Now we still have to deal with the approach notes. A successful arrangement has a lot to do with how well these approach notes are harmonised. We also still have some dissonant major 7 chords with the root on top at the beginning and end of the phrase that need fixing. Before we move on with this melody, we need to take a little detour and look at the few different ways we can ‘approach’ harmonising them (sorry…):
APPROACH NOTE HARMONISATION
Chromatic Approach
A chromatic approach note is a note that isn’t in the key of the moment. It moves into a chord tone by half-step:

Chromatic Approach
Here, the C# approach note belongs to D, the root of the Dm7 chord. To harmonise a chromatic approach like this, first harmonise the target chord and then move all other harmonies of the chromatic approach into the target chord by step:

Chromatic Approach Harmonised
Diatonic Approach
A diatonic approach note is a note that is in the key of the moment. It can move into a chord tone by half or whole step:

Diatonic Approach
To harmonise this, we can just use notes that are diatonic to our key of moment:

Diatonic Approach Harmonised
(Note: In this example the key is not clear as we only have one chord. The Dm7 could be a vi in F major or a ii in C major. If it’s in F major, the Bb we’ve used is correct as our harmonisation of our diatonic approach note stays diatonic to F. If the key is really C major, we’d have to change that Bb to a B natural. Read more about chord-scales here.)
Dominant Approach
A dominant approach harmonisation involves making the approach note a dominant 7 chord of the target note. This effectively makes the target note the tonic for a very brief moment.

Dominant Approach
This only works if the approach note is part of the required dominant chord. However, as the dominant 7 chord can be normal or altered, you have a lot of notes to choose from so can nearly always make it work.
Here, the approach note is a C#, so making the chord an A7 is easy:

Dominant Approach
Even if we had a C natural, we could treat this as a #9 of A7 and still get away with making it a dominant approach.
You can take it one step further and add a secondary dominant too, if the approach notes allow it. Here, I’ve crammed in a ii V I in Dm (Em7b5-A7-Dm) to appease the jazz gods:

Secondary Dominant Approach
Diminished Approach
A diminished approach is similar to a dominant approach but instead, you make the approach note a fully diminished 7 chord:

Diminished Approach
(Note: This is the same as doing a dominant approach but replacing the root with a b9 for a crunchier sound.)
Parallel Approach
A parallel approach is a bit of a ‘catch-all’. You can use it with any type of approach note. You copy the same movement of the approach note into the target chord in all the voices. If it moves by a whole step, so do all the other voices; if it’s a third, so do all the other voices etc.

Parallel Approach
Here, the upper neighbour note (E) moves into the Dm7 chord by a whole step, so all the other voices follow. When using the parallel approach, the approach chord will always be the same quality (minor 7, major 7 etc.) as the target chord which is useful for blending it into a texture.
Multiple Approach Notes
There are some occasions where we end up with multiple approach notes. These are often enclosures (double-neighbour notes) like this:
Enclosure
We can deal with them in one of two ways:
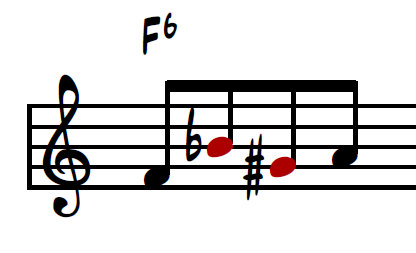
Try to make them into a ii V I of your target chord. This usually works and is pretty effective. Here the V chord has been made into a V+7 because of the G#:

Enclosure Harmonisation 1
2. Use parallel harmonisation on both approach notes. Work backwards from the target note. So first I complete the harmonisation of the G# approach note using half steps into the final F6 chord. Then, as Bb is a tone away from G#, harmonise the Bb approach with notes a tone away.

Enclosure Harmonisation 2
FINISHING THE FOUR-WAY CLOSE
Okay, back to our melody. Earlier, we were harmonising this melody and got this far:

Approach Note Harmonisation
We harmonised the target notes in accordance with the harmony (which is just C6).
Now let’s use a mixture of these approach note harmonisations to effectively harmonise the non-chord tones:
Melody Fully Harmonised
In the first dominant approach, in the lowest voice, I substitute the root of the chord (E) for the b9 (F) for voice leading reasons. We don’t want an awkward repeated E in the same voice and this creates a nice connection to the G natural on beat 2. I then used a diminished and chromatic approach on the other two notes, which is just personal preference, although a bunch of options were available.
Notice that in the final chromatic approach, I use D# to E in the top voice, even though earlier I used Eb to E for transposition reasons. Here it shows the harmony more clearly, but in the part it would still be best to enharmonically respell it so it makes sense to the player.
DROP-2
When working only in four-way close, we come up against two problems:
The range is very limited. When working with a big band and using four-way close, the lowest voice often goes too high or the highest voice too low. It rarely sits well for every instrument all of the time.
In chords with dissonant intervals, like between the root and 7th in a major 7 chord, the dissonant interval often appears at the top of the chord. This happens when the root is in the top voice and having the 7th just below obscurs the melody.
We can get around this by using an open voicing. If you remember, a close voicing is one that is within an octave. An open voicing is always greater than an octave. Open voicings in jazz are drop-2, drop-3 and drop-2/4 voicings.
To get a drop-2 voicing, we take our four-way close voicing, and drop the 2nd note from the top down an octave:
Drop 2 Voicing
Generally, if it’s not within a texture, we want to keep the interval between the outer voices consonant. That means if I had used Cmaj7 instead of C6, the minor 9th interval created between B and C still isn’t ideal. Here I used C6 instead to avoid this problem, but I could have substituted one of our chord tones, remembering our chart from earlier.
If we had to keep the chord as C maj 7 we might have to swap out the root for a 9th and be left with very little choice. Otherwise we would have a minor 9th interval between the B and C.

Drop-2 Substitution
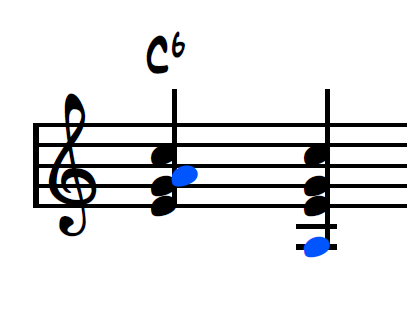
Drop-2 voicings have a stronger, more open sound than four-way close so work well to clear up mud in a harmonisation. They work particularly well together when most of the melody is harmonised with four-way close (blue) and then drop-2 (red) is used on important target notes. Here, I use drop-2 for the last two chords.

Close & Drop-2 Voicing
DROP-3
To get a drop-3 voicing, following the same logic as drop-2, we start with four-way close and then drop the 3rd note an octave:

Drop-3 Voicing
Drop-3 is much less common than drop-2 as an arranging technique. This is because they create 2nd inversion chords and don’t feel as good to play or to tune, and they still leave a dissonance in the top voice. We usually use a drop-voicing to get rid of this. They’re definitely possible though should voice leading or range considerations call for it.
DROP-2/4
Drop-2/4 voicings are common. They involve dropping the 2nd and 4th note an octave from a four-way close voicing:

Drop-2/4 Voicing
This creates a very open, powerful sound. It’s less blended than other voicings and from my experience, depending on the harmony, can take longer for players to get them in tune. But they’re great to get rid of the dissonant melody problem and to put the notes of the chord in a comfortable register for most instruments that will be playing them.
As you get more experienced as a jazz arranger, you’ll probably start to look at more complex drop-2/4 voicings as potential polychords instead:

Drop-2/4 As Polychord
FIVE-PART VOICINGS
Writing in five parts is just as common as writing in four for jazz arranging. The fact you have five saxes in a big band lends them nicely to playing harmonised passages in five voices. Usually, the most common way of adding a fifth voice is to double the top of a four-way close voicing down an octave (8vb):

5-Part Voicing
This works well for four-way close, but when any other voicings are used, our 4th voice will dip below our 5th. It’s up to the arranger at that point to decide what line or voice they want doubled - usually it’s the top one.
Here I’ve used a drop-2 voicing for the first five notes and kept the top voice doubled down an octave. I use close and drop voicings as necessary to create a smooth, even part for the lowest voice, picking and choosing whatever note in the chord gives smooth bass motion. The top voice is always doubled down the octave at some point, even though it travels throughout the voices:

5-Part Voicing - Close & Drop-2 Mix
REPEATED NOTES
When we’re arranging, we often get repeated notes in inner voices:
Repeated Note
This is not ideal for two reasons:
A repeated note at speed is not an easy thing to make swing. It ruins the flow of the line and each player should feel they’re playing something melodically interesting.
It causes blend and balance issues. For example, a repeated tenor sax note at speed is going to stick out more than a legato one and the players just have to work harder to make it sound convincing.
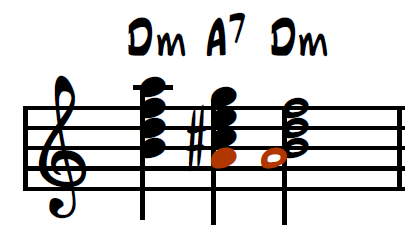
We can get around the problem of repeated notes in most cases by substituting the chord tone for another available one. In the process, we might find it actually makes the harmony more interesting! Here, I’ve changed the A of the A7 to a b9 (Bb) creating a nice descending voice of B-Bb-A in the fourth part.
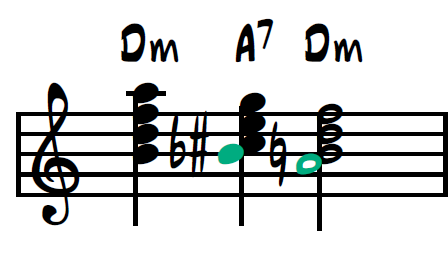
Repeated Note - Fix 1
Another fix for this is by changing the voicing of the chord completely. I’ve changed the last chord to a drop-2 so the fourth voice now drops a fifth and gets rid of the repeated note.

Repeated Note - Fix 2
If you’re desperate to have the voicing exactly how you wrote it and these two options just won't do, you can always voice-cross and have a different instrument take over that one note and then jump back to its original line.
Having said all that, slow repeated notes on background and non-melodic lines are fine. In fact, they create a nice bed on which the melody sits. It’s only in anything melodic or fast this warning is applicable.
