13 | Soli Writing

The soli is the heart of the big band arrangement. It would be rare to find a chart without one. A soli in a big band context usually involves a group of instruments playing a harmonised melody. Overwhelmingly often it’s the saxes. Sometimes though it’s also just trumpets, trombones or mixed timbres.
Before you continue, if you haven’t already, you’ll want to check out my articles on voicing as they come up a lot when writing solis. In fact, writing a soli is pretty much just a variety of different voicing techniques. You’ll want to have a good understanding of four-way close, drop voicings and free voice leading.
To begin, let’s look at writing a soli with a fool-proof method for harmonising a melody. I’m going to use five parts for this representing the five saxes in a big band.
1. WRITE THE MELODY
You can take a simple melody and embellish it based on the harmony, take one from a lead sheet, or come up with one from scratch. Here I’ve started with a simple tune with simple harmony:

Simple Melody
I’ve then elaborated on it and also made the harmony more interesting with chord substitutions and reharmonisations. This is the melody we’ll use for our soli:

Elaborated Melody
2. HARMONISE THE TARGET NOTES
There will be some notes in the line that are stronger than others. They are often chord tones and on rhythmically strong beats. We’ll harmonise these first, ignoring our non-chord tones and approach notes:
Harmonised Target Notes
In blue is four-way close, in orange drop-2 and in green is a quartal voicing. I’ve used four-way close for most of it, and occasionally drop-2 if range was getting to be an issue for our saxes or the melody would be obscured. We also don’t want the bari getting too high as the line rises.
Remember that notes can be substituted within a chord. For example, C7 might have a D instead of a C as a root can be subbed for a 9th. Don’t be caught off guard if the voicing you’re looking at has a bunch of substituted notes.
3. HARMONISE THE APPROACH NOTES
Now we fill in the gaps between our target notes using one of the five ways of harmonising approach notes. Just to remind you, those five ways of harmonisation are chromatic, diatonic, dominant, diminished and parallel. To recap those in more detail, check out my first article on voicings.
We could have also harmonised the approach notes with free voice leading. For now, I’m keeping it simple by being quite formulaic, but free voice leading is great for featured solis with really interesting independent lines:
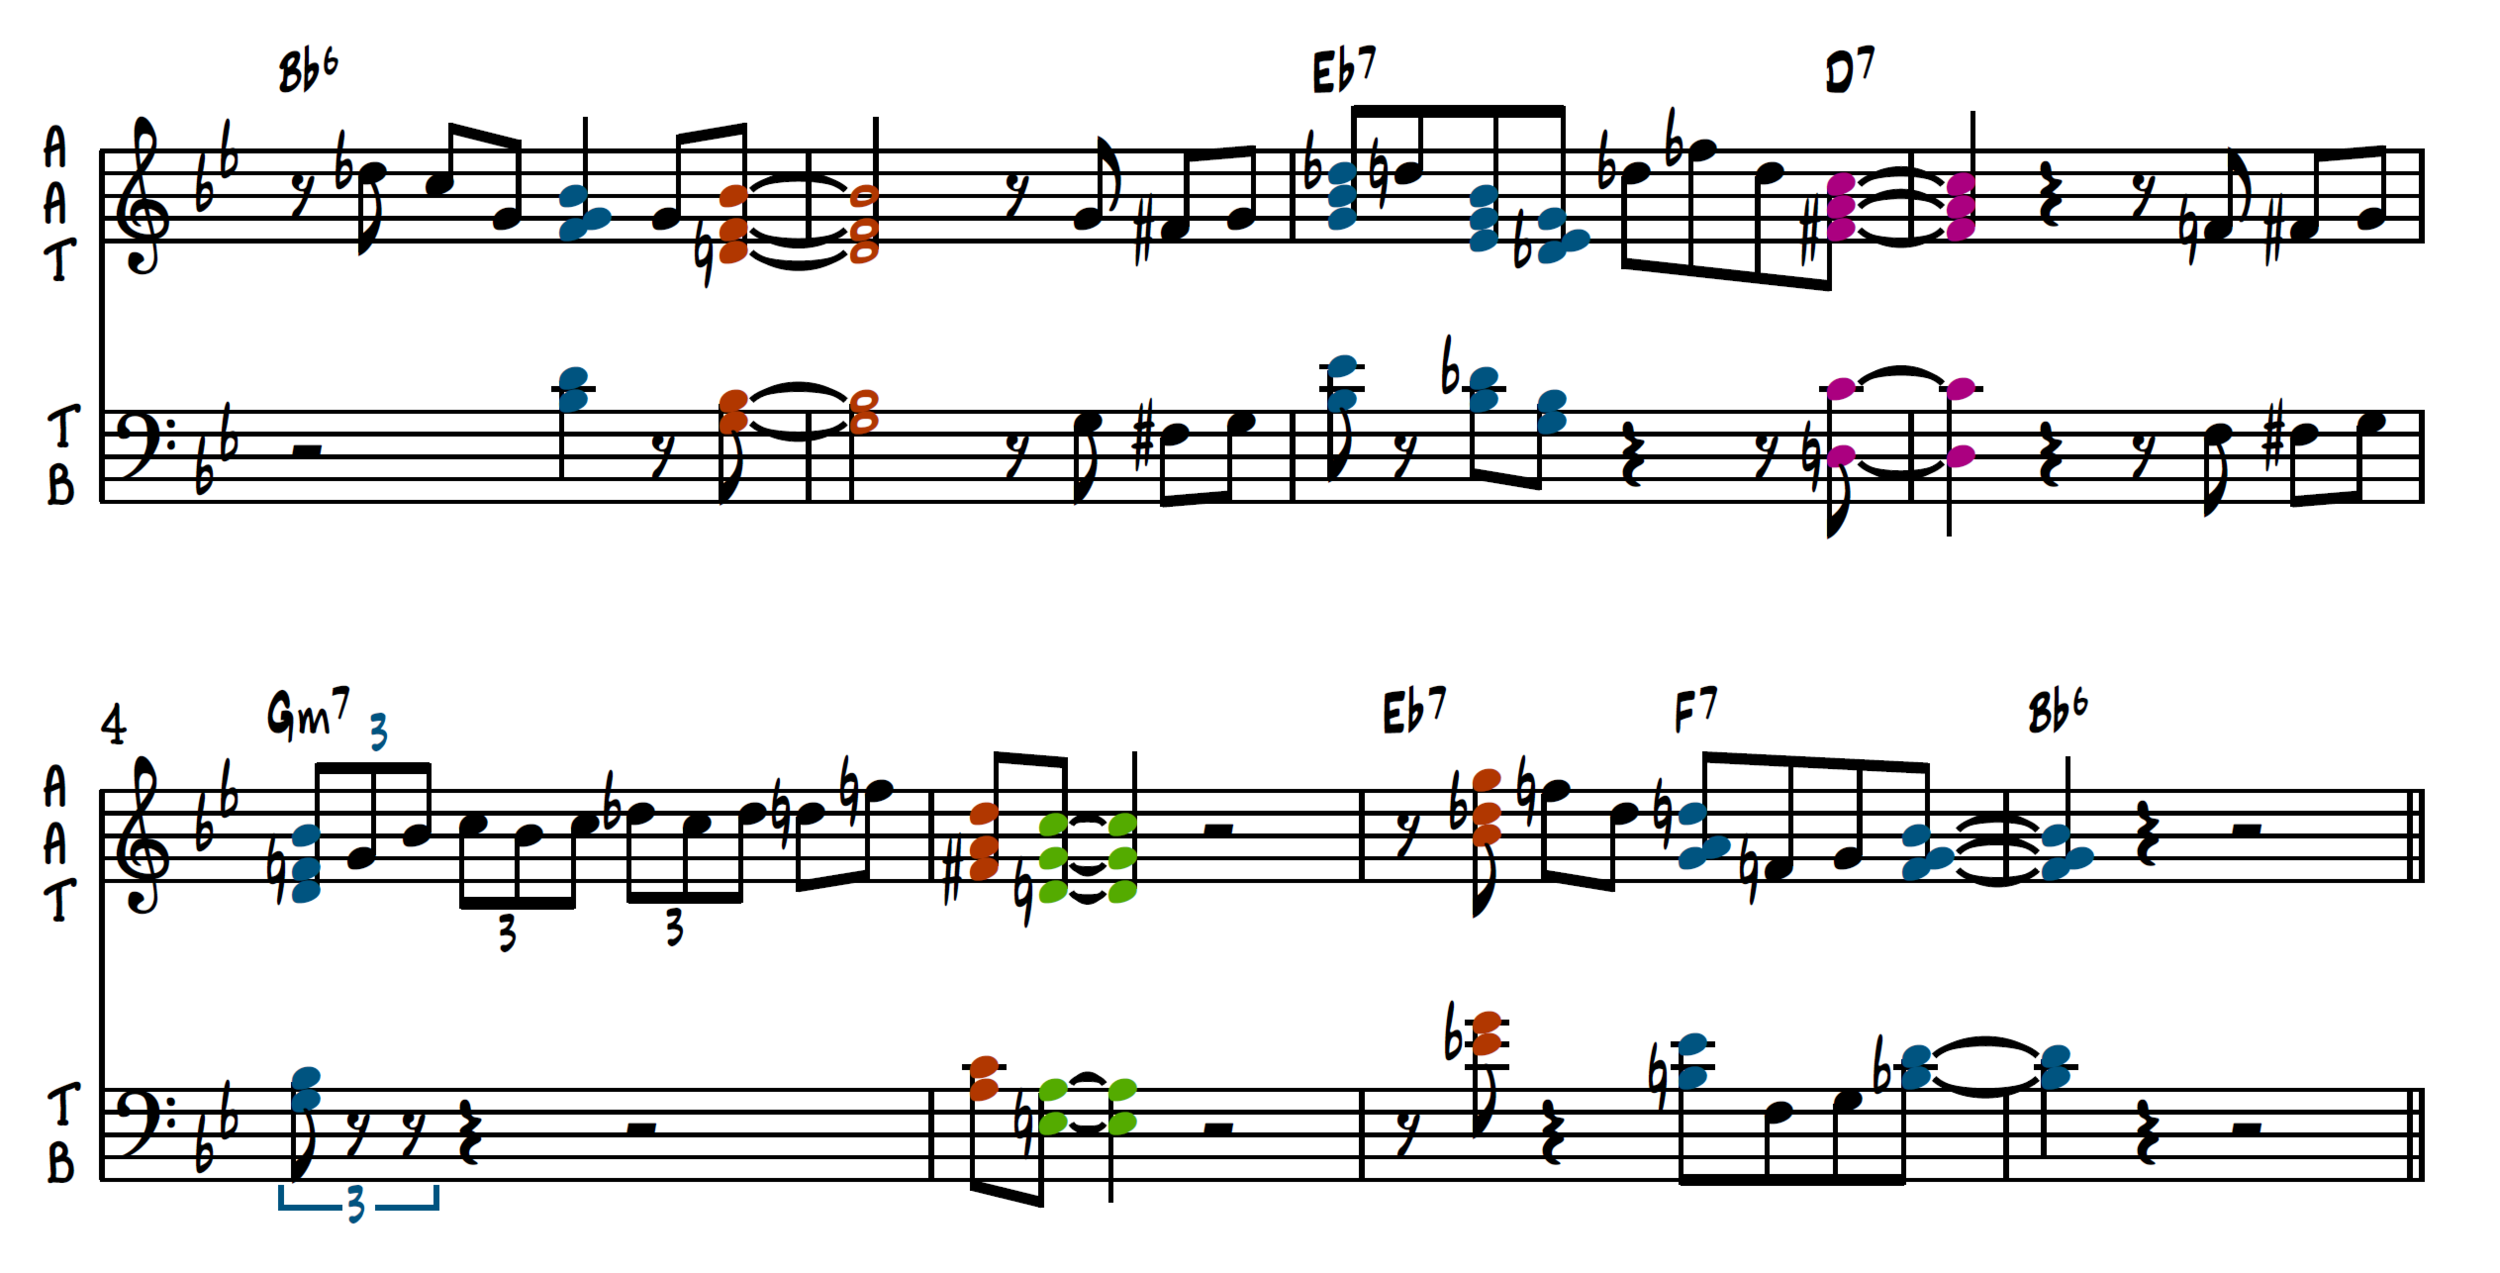
Here’s the soli completed and analysed, and a version without all my scribblings on it:

Harmonised Soli

Soli - No Annotations
The final soli once we transfer it onto the sax parts might need some tweaking with regards to voice leading and some of the target note voicings might need changing, but the structure should all be there.
You’ll notice I use a variety of colours and annotations. I try to keep these consistent throughout the articles:
Blue chords indicate four-way close.
Orange chords indicate drop-2 and drop-2/4 voicings.
Pink chords indicate spreads.
Green chords indicate quartal voicings.
The ‘V’ symbols over chords indicate target chords.
In the middle of the stave, I show how I harmonised the approach notes (more on this below).
At the bottom of the stave I show the chords and their function, treating each phrase as its own key centre (although the whole 8-bars are clearly in the key of Bb).
I’ve labelled the phrases 1, 2, 3 and 4 at the top of each stave with lines. Let’s break down what I’ve done phrase-by-phrase:
Phrase 1

Phrase 1
The first target chord is a Bb6 (beat 3). I worked back from here and harmonised the approach note with an F7, the root replaced with the 9th (G) in the melody. The chord before that I kept as an F7 as the melody note (C) supported it. For the very first chord I then used a secondary dominant - V7 of F7. The melody note is Db, a b9 in a C7 chord, so replaces the root (C).
The final two notes of the phrase are a V7-I. The V7 has the 9th on top again instead of the root and the I chord is a drop-2 voicing for a strong Bb major triad in the top 3 voices.
Phrase 2

Phrase 2
The second phrase starts with octaves before breaking into harmony on the target chord, almost like a cascade. When you go from unison or octave lines into harmony, it can be hard to avoid repeated notes. Unfortunately here there will always be a repeated note somewhere unless we don’t include the 3rd (G) in the Eb7 chord. Here it’s in Tenor 1.
The first 4 chords of the Eb7 bar are all Eb7 chords apart from a passing diminished chord. This Dm7b5 is also a drop-2 voicing because as the melody goes up, the inner parts can move smoothly down to connect beats one and two.
The chords in pink are spread chords. Sure, I could analyse them as four-way close, drop-2 etc. but they weren’t conceived like that when I harmonised the line and they follow all the rules of spread voicings.
We knew that we had to get to the D7 as we harmonised that as one of our target chords. I used a dominant approach, but didn’t use an A7. Instead, I used the tritone substitution of an A7 - Eb7. This was ideal as it fit the harmony of the bar, the melody note supported it and led perfectly to D7.
Harmonising the approach into this Eb7 I found the melody had an E, so I could use the bII7 of Eb7 - E7. I then used one more tritone sub before this E7 to create a chain of four descending tritone-subbed dominant 7 chords and ensured the bottom two voices moved chromatically down in 7ths. This creates a very strong pull to the D7.
These last few chords in pink came out of trying to connect the lowest line chromatically between the two target notes. The inner voices were just a result of filling the space between the lowest and highest note.
Phrase 3

Phrase 3
The third phrase features ascending triplets. I thought about having these in octaves rather than harmonised but it works better as a sax soli to harmonise them. I use drop-2 voicings to keep the space in the top three voices more open so the melody is clearer. The fourth voice also doubles the melody 8vb.
The chords on beat 4 are Gm7 chords. On the approach note before them I used a dominant approach - D7. Working backwards, on the two notes before this dominant approach I harmonised with chromatic approaches - each inner voice moves from a half-step below into the next chord.
In bar 5 the two target chords create a V7-I in Gm. The I chord uses a quartal voicing, harmonising from the top note (C) down in 4ths.
Phrase 4

Phrase 4
The final phrase is a simple IV7-V7-I in Bb major to end the 8-bar section. The first chord is a target chord and harmonised as a drop-2 voicing of Eb7. The next target chord is an F7. The D in the melody creates an F13 chord while the root is changed to a 9th in Tenor Sax 1. This is for voice leading reasons to avoid a repeated F. The B natural in the bari sax creates a chromatically descending bassline through most of the bar and sets up the final resolution to Bb. This happens to make the V7 chord more of an F13(#11).
Working backwards from this F7 target chord, I used a dominant approach which is heavily altered. The Db and Gb used for the melody and voice leading reasons respectively create a C7(b5, b9) sound. I would have used G natural, but this would have led to a repeated note in the F7 chord.
Finally, working backwards from the C7, I used a secondary dominant. Rather than G7 though, I tritone substituted it for Db7 as this put the third in the melody and formed a good passing chord between Eb7 and C7.
The final chord is a close position chord of Bb6 after a small, two-note octave break so the final chord is more impactful.
Still with me? That’s how we got this far thinking of harmony, melody and voicings alone. Next is actually putting it on some saxes.
4. APPLY IT TO THE INSTRUMENTS
Finally, as the last step, I’m going to superimpose the five parts onto the saxes. There are a few things to check at this stage:
Repeated notes. Avoid repeated notes in fast-moving solis as these stunt the line and end up being articulated differently. Get rid of them by harmonising the top note with a different supporting harmony. There are some cases in this soli where going from unis to chordal parts that were unavoidable.
Extremes of range. Don’t let the lines get too high or too low. For saxes, (apart from maybe Alto 1 at the top and bari at the bottom), lines should try not to touch the top or bottom 4th of the instrument’s range for maximum blend and control.
Voice leading. I keep going on about it, but if voicings have to change that’s better than having awkward leaps in the inner parts. We also harmonised the target notes first so check our new approach note harmonisations work well.
Enharmonic spelling. I always spell my lines in the best way possible for the player, even if it’s enharmonically incorrect. That means a #9 in a C7 chord might be spelled as an Eb for the player rather than D#, usually depending on voice leading.
Add articulation to the lines as needed for interest and to shape the phrasing.
Once all of that is checked, the final sax soli should look and sound something like this:

Final Soli
What Does Everyone Else Do During A Soli?
The other sections - usually trumpets or trombones - interject in between sax phrases or rest. They can also be used to build up toward the end of the soli. It’s fine for a section to sit out for 16 bars or so. It’s also usual for sections to provide backings that support the target notes without getting the way of the melody. The rhythm section is also usually always playing or ‘comping’ over the harmony.
SOLI FURTHER LISTENING
To show it all in action, I’m going to recommend three solis for listening to from various points in big band history. Transcribing, studying and listening to these will help embed a natural melodic and harmonic language for creating solis.
Three And One - Thad Jones
The first example is a very standard approach to writing a soli by a great arranger. Saxes are always a favourite to carry a soli and the sound is balanced and blended throughout. The sound is quite thick throughout and some of the diminished passing chords could be thought of as dated, but it’s a timeless effect that sounds great on swing tunes.
Listen To Three And One - Thad Jones (Soli starts at 0:43)
Count Bubba - Gordon Goodwin
Second up is the sax soli from Count Bubba by Gordon Goodwin. I’ve chosen this because it’s exposed - no rhythm section - so you can really hear what’s going on. It’s also a very modern approach to writing for big band with a clear, open sound. Notice that after the trumpet and trombone solis, the whole band plays. This is more of a shout chorus but it’s great to hear the horns on their own. Hal Leonard have the score up on Youtube for parts of the soli too which I’ll link here:
Listen To Count Bubba - Gordon Goodwin (Soli with band at 00:42. Soli for each section alone at 1:19)
A Warm Breeze - Sammy Nestico
Sammy Nestico is a big band arranging giant, this sax soli is laid back and swings hard. The section is balanced throughout and scoops and bends are used effectively. The whole chart, but especially this soli is a very typical use of the kind of voicings in this article.
Listen To A Warm Breeze - Sammy Nestico (Soli starts at 1:20)
METHOD RECAP
To round this article off, here’s the step-by-step process I’ve outlined for writing a soli:
Write the melody and keep it simple.
Embellish the melody and harmony.
Harmonise the target notes.
Harmonise the approach notes.
Write it out for the instruments, checking voice leading, range and articulations.